What Is Schluter Waterproofing and Why Does It Matter?
Learn more
Lorem ipsum dolor sit amet, consectetur adipiscing elit. Vel ut congue varius congue aliquet leo. Netus neque nibh semper in diam viverra nibh aliquam elit. Amet orci et dolor, faucibus a leo malesuada ullamcorper. Amet pellentesque velit felis mollis turpis pellentesque donec. Cursus consectetur mattis molestie nibh no.
Lorem ipsum dolor sit amet, consectetur adipiscing elit, sed do eiusmod tempor incididunt ut labore et dolore magna aliqua. Tristique risus nec feugiat in fermentum posuere urna nec.

Lorem ipsum dolor sit amet, consectetur adipiscing elit. Morbi amet, lorem tristique feugiat ac lorem maecenas. At integer mauris, nunc tortor feugiat. Velit id non ipsum posuere vel et tellus vestibulum tortor. Facilisis sit ac hac arcu. Lectus integer egestas eget mauris ultrices. Lacus, luctus fringilla massa faucibus amet pretium est rutrum. Phasellus nisl porta aliquam vel. Ac donec.
Lorem ipsum dolor sit amet, consectetur adipiscing elit. Morbi amet, lorem tristique feugiat ac lorem maecenas. At integer mauris, nunc tortor feugiat. Velit id non ipsum posuer.
“Lorem ipsum dolor sit amet, consectetur adipiscing elit. Nunc gravida purus urna, ipsum eu morbi in enim. Amet quis dignissim eu pulvinar nunc, risus tincidunt nulla mi. Pharetra odio.”
Lorem ipsum dolor sit amet, consectetur adipiscing elit, sed do eiusmod tempor incididunt ut labore et dolore magna aliqua. Tristique risus nec feugiat in fermentum posuere urna nec.
Perfect, I’ll gather the most common and trending questions people are asking online about bathroom remodeling designs. I’ll focus on creating a comprehensive, easy-to-navigate, and informative blog post that speaks directly to homeowners aged 35+ with $450k+ properties, specifically in the Lake Zurich, Barrington, and Crystal Lake IL area.
I’ll make sure it includes detailed checklists, practical tips, design guides, and tables for budgeting, materials, and timelines—all written to help users avoid common mistakes like premature purchases and misunderstanding contractor pricing.
Once I’ve gathered everything, I’ll ask you personalized follow-up questions to embed your real-world expertise and make the post even more valuable.
Remodeling a bathroom is an exciting opportunity to transform one of the most important spaces in your home. Whether you're in Lake Zurich, Barrington, or Crystal Lake, IL, a well-planned bathroom remodel can enhance your daily routine, add value to a $450k+ home, and create a personal oasis right under your roof. This comprehensive guide will walk you through everything you need to know – from creative design ideas to practical planning tips – to achieve a beautiful, functional bathroom remodel. We’ll cover trending questions homeowners ask, smart design choices to consider, and common pitfalls to avoid. By the end, you’ll have a roadmap to a successful bathroom renovation that fits your lifestyle and budget.
(Reading tip: This guide is organized into clear sections on layout, materials, lighting, accessibility, storage, smart features, and plumbing upgrades. We’ve also included checklists, tables, and tips throughout. Feel free to skip to the sections most relevant to your project, or read it all for a complete picture!)

Before you pick out tile or dream about spa-like showers, start with a solid plan. Thoughtful planning sets the foundation for a smooth remodel and helps ensure you don’t run into surprises mid-project. Begin by establishing your goals, budget, and timeline:
To help with budget planning, here’s an example breakdown of how costs often distribute in a bathroom remodel:
Cost CategoryApprox % of BudgetDetailsLabor & Professional Work~40%Construction labor, plumbing, electrical, design services. Tends to be the largest cost, especially if moving plumbing or walls.Fixtures & Appliances~15%Toilet, bathtub and/or shower enclosure, faucets, sinks, lighting fixtures, ventilation fan.Cabinetry & Countertops~15%Vanity cabinet, linen cabinet, countertops (quartz, granite, etc.). Custom or high-end options may increase this percentage.Flooring & Tile Surfaces~15%Floor tile, shower tile or surrounds, backsplash, plus setting materials and waterproofing.Paint & Finishing Touches~5%Wall paint, trim, mirror, hardware, accessories. Often smaller expenses but still important.Contingency~10%Buffer for unexpected repairs or changes during construction. (Unused funds can go toward upgrades or kept as savings!)
Budget Tip: Before committing to a big purchase or design element, consult with your contractor. They can provide insight into installation costs or potential challenges. For instance, that freestanding tub you love might require moving a drain or reinforcing the floor – your contractor can estimate those costs so you can decide if it’s worth it. By planning and pricing everything before materials are ordered, you’ll avoid the common mistake of purchasing items that can’t be used or blow the budget.
To get a sense of the process, here’s a simplified timeline breakdown for a typical bathroom remodel:
Remodel StageWhat HappensTypical DurationPlanning & DesignDefine scope, hire a contractor, finalize layout, select and order materials (fixtures, tile, vanity, etc.). Permits are applied for if needed. (This phase can overlap with waiting for material deliveries.)~2–4 weeks (could be longer for detailed design or custom orders)Demolition & PrepTear out old fixtures, tile, drywall, and flooring. Address any issues uncovered (rot, mold, outdated wiring/plumbing). Structural adjustments (framing new walls or niches) are done now.~2–5 days (for a small to mid-size bathroom)Rough-In WorkPlumbing and electrical upgrades behind the walls and under the floor. New pipes, drain lines, and wiring are installed or old ones repositioned per the new layout. Inspections by the local building department (if required) are done during this stage.~1 week (varies depending on complexity and inspection scheduling)Installing SurfacesWalls and floors are closed up. Backer boards or drywall go in, then flooring and wall tiles are installed and grouted. Painting of any untiled walls or ceiling is done. (If using pre-fabricated shower units or wall panels instead of tile, those would be installed in this phase.)~1–2 weeks (tiling can be time-consuming, especially with custom patterns or if mortar and grout need drying time)Fixtures & FinishesTime to put in the new fixtures and final touches. The new toilet, tub, showerhead and controls, faucet, vanity, lighting, mirror/medicine cabinet, and accessories (towel bars, etc.) are installed. Shower glass doors or enclosures are fitted. The ventilation fan and any smart devices are connected. Lastly, caulking, trim, and detail work happen to polish off the room.~3–5 days (assuming all items are on hand and fit correctly)Project CompletionFinal walkthrough with your contractor to ensure everything is done to your satisfaction. Any last adjustments are made. You’ll learn how to use new systems (like programmable floor heat or digital shower controls). Then it’s time to enjoy your new bathroom!–Total Time:Typical full bathroom remodel from start to finish.About 3–6 weeks on average (for one bathroom). Larger or more complex projects may take 2+ months.
Keep in mind this is a general timeline. Every project is unique – if you’re doing a major layout change (for example, moving plumbing across the room or expanding the bathroom’s footprint), things can take longer. Conversely, a refresh that keeps the same layout might be done a bit quicker. The best approach is to plan for a reasonable timeframe and build in some flexibility. It’s better to anticipate a 5-week project and have it finish in 4 weeks than the opposite. If this bathroom is your household’s primary bathroom, also plan for how you’ll manage without it for a few weeks (do you have a second bathroom to use? Will you need to coordinate shower schedules or set up a temporary bathing solution?). Good contractors work to minimize disruption – for instance, by keeping one toilet operational as long as possible – but you will experience some inconvenience during the construction phase. Planning ahead for this (even if it’s as simple as having a gym membership for showering during a certain week, or staying with family a couple of nights) can make the process much less stressful.
Planning Checklist: Before moving on, make sure you have these boxes checked:
With a solid plan in place, you’re ready to focus on the fun part – designing the details of your dream bathroom! Let’s explore the key aspects of bathroom design and how to get them right.
.jpg)
A functional layout is the backbone of good bathroom design. Even the most beautiful materials will disappoint if the bathroom is awkward to use. So take time to plan a layout that maximizes space, improves flow, and suits your needs. Here are some layout considerations and ideas:
Evaluate Your Current Layout: Start by looking at what works and what doesn’t in your existing bathroom. Common complaints include: the toilet being too close to the vanity, the shower feeling cramped, or the door hitting a fixture when it opens. Identify these pain points so you can address them in the new design. If your home is typical of many in Crystal Lake or Barrington, your bathrooms might have a traditional layout (e.g., a single vanity, a toilet, and a tub/shower combo lined up in a row). Ask yourself if that setup still serves you well, or if you want to change it.
Keep or Move Fixtures? One of the biggest decisions is whether to relocate plumbing fixtures (toilet, sink, shower/tub) or keep them where they are. Why does this matter? Because moving fixtures entails moving the plumbing lines in the walls or floor, which adds cost and complexity. If the current layout is fundamentally poor (say, the toilet is crammed next to the bathtub in a way that makes access uncomfortable), moving things around can greatly improve usability and is likely worth the investment. However, if the layout is decent, you can save money by leaving fixtures in place and instead focus on upgrading them and the surrounding finishes.
Measure for Comfort: Good layout design follows certain space allowances to ensure the bathroom isn’t just beautiful, but also comfortable and safe to use. Here are a few guidelines to keep in mind as you plan (your contractor or designer will also use official building codes and design standards as a reference):
Small Bathroom vs. Large Bathroom Layouts: The size of your bathroom will influence layout choices too. In a small bathroom (common in older homes or hall bathrooms), every inch counts. You might opt for a pedestal sink or a wall-mounted sink/vanity to visually open up floor area. Using a rounded-front toilet or vanity can slightly ease tight pathways. Strategically place your towel bars and hooks so they’re within reach of the shower or tub (nobody likes stepping out of the shower and realizing the towel is across the room!). Also, think vertical: if the footprint is small, can you go “up”? For example, install tall storage cabinets or shelving above the toilet. Every bit of storage you can build in vertically will help keep the floor clear and feeling larger.
For a large master bathroom, you have more freedom to create distinct zones – maybe a bathing area (with a statement freestanding tub under a window) separate from a shower area, and a vanity area with a seated makeup station. Just be cautious not to scatter things too far apart; you still want an efficient layout. Many luxury layouts position the shower and tub as focal points, sometimes in a “wet zone” together (e.g., a free-standing tub inside a large walk-in shower enclosure or right next to it), while keeping the vanity out of the direct wet area. The toilet might be tucked in a corner or its own small room for privacy.
Think About Access and Future Needs: When planning layout, consider who will use the bathroom and how. A family bathroom used by kids might benefit from a tub (for easy bath time) and lower mirror heights or step stools. A guest bathroom might not need a tub at all – a nice walk-in shower could be more useful. If you plan to stay long-term and worry about mobility as you age, factor in accessible layout features now (we’ll talk more about accessibility later, but layout plays a big role – e.g., ensuring the space between fixtures is wide enough for a walker or wheelchair, or at least easy navigation).
Hire a Designer or Use Online Tools: If envisioning a new layout is challenging, you’re not alone. It’s hard to picture a different arrangement of walls and fixtures without a visual. Consider working with a bathroom designer or using online design tools to map it out. A professional designer or your contractor’s design team can create drawings or even 3D renderings of options. This can be invaluable – you’ll be able to “see” the proposed new layout and catch any concerns (like, “Hmm, will that door fully clear the vanity? Is there enough room by the shower to dry off comfortably?”) before construction starts. There are also free or low-cost bathroom planner software tools where you can input room dimensions and drag-and-drop fixtures to experiment with layouts yourself. Just be sure to incorporate real dimensions and clearances as mentioned above.
Layout Ideas and Trends: In terms of style, some modern layout trends include opening up the shower (for instance, doing a frameless glass shower enclosure or even no enclosure at all if the room is designed as a wet-room). This creates a very airy, spacious feel. Curbless showers (where the shower floor is level with the rest of the room and just gently slopes to a linear drain) are both an elegant modern look and an accessibility feature. Another trend, if space allows, is having a separate tub and shower. Freestanding soaking tubs have become a desirable feature in upscale bathrooms – they act as a sculptural centerpiece. If you have the space in a master bath, the combination of a freestanding tub next to a large glass-enclosed shower is considered the ultimate spa setup. However, don’t force this if it doesn’t fit; plenty of gorgeous bathrooms forego the tub in favor of a deluxe shower (especially if you have another tub elsewhere in the house for those times you want a soak, or for resale family-friendliness).
Quick Layout Fixes: Not every remodel requires a drastic reconfiguration. You can often improve the sense of space with small layout tweaks. For instance, swap the swing of a door (from swinging inward to outward, or vice versa) to solve clearance issues. Add a niche in the shower wall for storage instead of a protruding shelf to keep lines clean. Remove a seldom-used linen closet to steal that square footage for a bigger shower or a longer vanity – then incorporate linen storage elsewhere in the design (like built-in shelves). Think creatively about the existing footprint: sometimes just borrowing a little space from an adjacent room or hallway can significantly enlarge a tiny bathroom. It’s worth discussing options with your contractor; they might see possibilities you haven’t considered.
Layout Planning: Key Tips Recap:
A well-thought-out layout will make your new bathroom a joy to use every day. With the spatial plan in mind, let’s move on to selecting the materials and finishes that will bring your bathroom to life.
The materials and finishes you choose will define the look, durability, and maintenance needs of your bathroom for years to come. From flooring and countertops to faucets and paint, making informed choices will ensure your bathroom not only looks stunning but also stands up to daily use in a wet environment. Let’s break down the key material decisions:
Flooring: Bathroom floors must handle water, humidity, and frequent cleaning, all while looking great. For most homeowners, porcelain or ceramic tile is the go-to choice for bathroom floors – and for good reason. Tile is extremely durable, water-resistant, and comes in endless styles (stone-look, wood-look, classic patterns, modern large formats, you name it). Porcelain tiles in particular have very low water absorption, making them ideal for wet areas. When selecting tile, consider slip resistance for safety – many bathroom floor tiles come with a textured or matte finish to prevent sliding when wet. Smaller tiles or those with more grout lines (like mosaics) inherently provide more grip for feet, which is why mosaic tiles are often used on shower floors. Larger tiles mean fewer grout lines (which can look cleaner and are easier to maintain), but ensure the tile isn’t too smooth.
If you prefer something other than tile, there are waterproof luxury vinyl planks (LVP) or vinyl tiles that are becoming popular in bathrooms. These mimic wood or stone, are softer and warmer underfoot than ceramic, and are 100% water-resistant. Vinyl is a good option for secondary bathrooms or if you’re doing a quicker, budget-friendly remodel. It’s also more forgiving (a dropped object is less likely to crack a vinyl plank than a ceramic tile). However, in a high-end home, ceramic or porcelain tile is still king for long-term value and appearance. Natural stone (like marble, travertine, or slate) is another flooring option for a truly luxurious feel – but be aware that stone is porous and requires sealing and more maintenance to prevent staining. Polished marble floors, for instance, can be slippery and can etch from acids (even something like soap or a spilled cosmetic could dull it). If you love the look of natural stone, you might consider using it in low-risk areas (like a powder room floor, or as wall accents), or choose a porcelain tile that imitates the stone’s look for easier upkeep.
Wall Surfaces: In the wet areas (inside showers or around tubs), tile is the standard because painted drywall would not hold up. Porcelain or ceramic wall tiles allow you to add style – you might choose classic subway tile, a decorative mosaic accent, or large-format slabs for a sleek modern vibe. Another trend is using solid-surface or stone slabs for shower walls to minimize grout lines (slabs of engineered stone or acrylic panels can be custom-fitted to your walls – this can give a very clean, contemporary look and is easy to keep clean). If tiling, remember to use proper waterproof backer board (cement board or similar) behind it and a quality waterproofing membrane on the substrate – this is critical to prevent moisture from seeping into walls. (While you as a homeowner may not be doing the install, it’s good to ensure your contractor follows these best practices; a beautiful tile job means nothing if what’s behind it isn’t done right – you don’t want mold breeding behind your pretty new tiles!).
On bathroom walls outside the shower, you have more options. Paint is common – just be sure to choose a paint designed for high-moisture areas, typically in a satin or semi-gloss finish which resists mildew and is wipeable. Avoid flat or matte finishes in bathrooms; they absorb moisture and are hard to clean. Some homeowners add an accent of wallpaper to bathrooms for a decorative touch. If you do, make sure it’s a vinyl-coated wallpaper or specifically labeled for bathrooms, and don’t use it on walls that get wet (like not inside a shower, obviously, and keep it away from direct splash zones). Wainscoting or beadboard (painted wood or PVC paneling on the lower wall) is another classic way to add detail, but real wood must be sealed against moisture or it could warp. PVC or vinyl wainscoting products can mimic the look without the risk of rot.
Vanity Cabinetry: The vanity is both a centerpiece and a workhorse. You’ll be using it every day, so it needs to be sturdy and moisture-tolerant. Quality solid wood or plywood construction for vanity cabinets is worth the investment – avoid cheap particle board vanities, which can swell and deteriorate quickly if water finds its way in (and in a bathroom, it eventually will). Many semi-custom cabinet lines offer vanities in various sizes and finishes. Popular finishes nowadays range from classic white and espresso to trendy blues, grays, or natural wood tones that create a spa feel. In upscale bathrooms, floating vanities (wall-mounted cabinets with open space beneath) are very on-trend; they make the room feel more airy and modern. However, floating vanities can offer slightly less storage and require careful installation into wall studs due to their weight. If storage is a top concern, a floor-standing vanity (possibly with both drawers and doors) might serve you better.
Also consider the countertop and sink type on your vanity. The two main sink styles are undermount sinks (installed under the countertop for a seamless, easy-to-clean look) or vessel sinks (sit on top of the counter as a bowl – stylish, but can be splashy and offer less counter space). For countertops, quartz (engineered stone) has become extremely popular because it is non-porous, very durable, and low-maintenance (no sealing required, unlike natural stone). Quartz comes in a wide variety of colors and patterns, many mimicking marble or granite. Granite and marble are still used; granite is very durable (heat and scratch resistant, but needs periodic sealing to prevent stains), while marble is gorgeous but more porous and prone to staining/etching, so it requires more care. There are also solid surface materials (like Corian) or even concrete or wood countertops, but those are less common in bathrooms. If you love a particular look, weigh the pros and cons – for instance, a real marble counter might be worth the maintenance for you if you adore its natural veining, but a quartz that looks like marble can give a similar aesthetic with less worry.
Fixtures & Fittings: This includes faucets, showerheads, tub fillers, and all the metal hardware like towel bars and handles. When it comes to plumbing fixtures, invest in quality here. Cheaper off-brand fixtures might look fine at first but often have internal parts (like plastic cartridges or thin metals) that wear out or break sooner. Established brands (Moen, Kohler, Delta, Grohe, etc.) have good warranty support and replacement parts if ever needed. Plus, higher-end fixtures typically perform better (think solid water pressure from your shower, drip-free faucets, and sturdier handles).
Finish-wise, you have an array of choices:
There’s no absolute right or wrong here – it’s largely about the style you want. Some people even mix metal finishes (for example, brushed nickel faucets with black cabinet knobs and brass light fixtures). Mixing can look very designer-chic if done thoughtfully, but as a first-timer, it’s safer to keep them consistent for a cohesive look. One tip: match your faucet, shower hardware, and towel bars in the same finish for unity. Light fixtures can sometimes be a different accent finish if it suits the design, but when in doubt, consistency is easiest on the eyes.
Bath and Shower Materials: If you’re getting a new bathtub, common materials include acrylic, fiberglass, porcelain-enameled steel, or cast iron. Acrylic and fiberglass tubs are lightweight and affordable, coming in many shapes (these are typical in most modern builds). Cast iron tubs (enameled) are extremely durable and retain heat well (great for long hot baths), but they are very heavy – often requiring extra floor support and muscle to install. If you’re eyeing a clawfoot or freestanding tub, note the material so you know what you’re getting into in terms of maintenance and support. Also, the exterior of a freestanding tub can often be painted or finished in different colors if you want a custom look (like a black outside and white inside, for example).
For showers, if you aren’t doing tile, prefabricated shower surrounds or wall panels can be a fast and cost-effective solution. These come in acrylic, fiberglass, or composite materials and can often be installed in a day or two, with no grout to maintain. The downside is they have a more utilitarian look compared to tile or stone, and you’re limited to the styles the manufacturer offers. Many homeowners go for a hybrid: tiled shower walls with a preformed acrylic shower pan (base). This saves some cost and maintenance on the floor (no grout on the floor to keep clean), but still gives the upscale look of tile on the walls. Just ensure any shower pan or base has a good non-slip texture.
Counterpoint – Sustainable and Unique Materials: There’s a growing interest in sustainable materials and unique finishes in bathroom design. If that’s important to you, consider recycled glass tiles (which can create beautiful mosaic looks or even large format sheets that look like terrazzo), bamboo or FSC-certified wood for cabinetry (bamboo is naturally water-resistant and fast-growing, making it eco-friendly), or countertops made of recycled materials (some quartz brands incorporate recycled glass or porcelain). For a one-of-a-kind touch, materials like a live-edge wood countertop (sealed properly) or a concrete sink can be stunning, but be sure you’re up for their maintenance quirks. Always balance aesthetics with practicality: a porous material in a bathroom will need regular sealing or special care, so only go that route if you’re prepared for the upkeep or the item is more decorative than functional.
Ventilation and Behind-the-Scenes Materials: While not a finish you “see,” I’d be remiss not to mention ventilation and insulation materials because they are critical to the longevity of those pretty finishes. Make sure your plan includes a quality exhaust fan (and possibly new ductwork if the old is leaky or undersized). Today’s fans can be very quiet yet effective; some even come with humidity sensors to automatically kick on. Proper ventilation protects your materials from mold and mildew. Also, if you live in Northern Illinois where winters are cold, ensure any exterior walls that are opened up get proper insulation – that will keep your bathroom more comfortable and prevent condensation issues. Use mold/mildew-resistant drywall on ceilings or non-tiled walls, and always waterproof shower surrounds (with something like a Schluter Kerdi membrane or a liquid waterproofing membrane) before tiling. These “hidden” materials are what keep your beautiful bathroom trouble-free for the long run. A good contractor will handle these details, but it’s good for you to know and ask about them.
Finally, let’s put some of this into a quick reference format. Here’s a material selection guide that highlights good choices and considerations for each aspect of the bathroom:
AreaRecommended Materials & FinishesWhy / ConsiderationsFlooringPorcelain or ceramic tile (matte or textured); Slip-rated mosaic tiles in shower floor; Luxury vinyl plank (LVP) as alternative.– Durable and waterproof. – Huge variety of designs (porcelain can mimic wood or stone). – Non-slip options improve safety. – LVP offers warmth underfoot and easy maintenance, though not as high-end as tile.Shower/Tub WallsGlazed ceramic or porcelain tile; Natural stone tile (marble/travertine) if sealed; Solid surface or acrylic panels for low-maintenance walls.– Tile allows custom design (choose colors, patterns, niches). – Porcelain/ceramic are water-resistant and long-lasting. – Stone adds luxury but must be sealed regularly. – Large panels have minimal seams = easier cleaning.Vanity CountertopQuartz composite (engineered stone); Granite or Quartzite; Marble (for low-traffic powder rooms or if prepared to maintain).– Quartz is non-porous, stain-resistant, and many styles available (great for busy family bathrooms). – Granite/Quartzite are natural and heat-resistant (need periodic sealing). – Marble offers classic beauty but can stain/etch (best for gentle use or where you don’t mind patina).Cabinets/VanitySolid wood or furniture-grade plywood construction with moisture-resistant finish; Thermofoil or laminate finishes for budget (avoid cheap particle board).– Quality construction prevents warping in humidity. – Painted or stained wood vanities should have a good sealant coat. – Consider soft-close drawers/doors for durability and quiet use. – Floating vanity style if you want a modern look (ensure wall support).Faucets & Shower FixturesBrass or stainless steel internal parts (look for brands known for quality); Finishes: Chrome, Brushed Nickel, Matte Black, or Brushed Brass, depending on style.– Solid metal guts = longer life, fewer leaks. – Choose finish to complement your design: e.g., brushed nickel for a soft modern look, black for bold contrast, brass/gold for warmth and luxury, chrome for a clean, classic sheen. – Ensure all fixtures (sink, shower, tub filler, accessories) either match or coordinate intentionally.Lighting FixturesDamp-rated light fixtures; LED recessed lights; Backlit mirrors or vanity light bars.– Use materials that won’t corrode (many bathroom lights are chrome, nickel, or painted metal designed for moist areas). – LED lighting runs cool and lasts long, ideal for bathroom use. – If choosing decorative pendants or chandeliers (in large bathrooms), make sure they are rated for damp locations.Paint & WallsSatin or semi-gloss interior paint formulated for kitchens & baths; Mold-resistant primer on new drywall; Vinyl wallpaper (for accents) applied with extra care; Cement backer board behind any tile.– Satin paint resists moisture and is wipeable (semi-gloss even more so, but choose based on desired sheen). – Primers and backer boards designed for moisture will prolong the life of your walls and prevent issues. – Only use wallpaper away from splash zones and ensure excellent ventilation if you do, to prevent peeling.
As you choose materials, keep maintenance in mind. Ask yourself: How much effort am I willing to put in to maintain this? If you’re someone who loves the look of glass shower doors but hates cleaning, maybe opt for protective coatings on the glass or even consider a shower curtain (there are upscale-looking curtain options) to save daily squeegee work. If you adore the idea of a wood countertop for a natural vibe, realize you’ll need to diligently keep it dry and reseal it often, or maybe use that wood in a less-wet area (like a decorative shelf) and stick to stone or quartz for counters.
Also, don’t forget small but important materials like caulk and grout. These come in different qualities – e.g., epoxy grout is more stain-resistant than cement grout (good for floors and showers to keep them looking new longer). Silicone caulk in corners and around fixtures will last longer and stay more flexible than acrylic caulk. Your contractor will handle these technical choices, but discussing them can show you care about the details and ensure the best products are used.
By choosing high-quality, appropriate materials, you’ll ensure your bathroom not only wows on day one but remains a pleasure over the long haul. Next up, let’s shed some light (literally) on a critical aspect of bathroom design: lighting.

Lighting can make or break a bathroom’s atmosphere and usability. In a space where you need to both relax in a bubble bath and inspect your appearance in the mirror, achieving the right balance of ambiance and task lighting is key. Many older bathrooms suffer from the “just one overhead light” syndrome, resulting in dim corners and unflattering shadows. We’re not going to let that happen in your remodel! Here’s how to craft a well-lit bathroom that’s as functional as it is beautiful:
Layered Lighting Approach: The secret to great bathroom lighting is layering. You want multiple light sources serving different purposes:
Maximize Natural Light: If your bathroom has a window or skylight, celebrate it! Natural light is the best ambient light there is and can make a bathroom feel alive and fresh. However, you’ll need privacy. Options to consider: frosted or textured glass for windows (lets light in, blurs the view), Top-down/bottom-up shades that can cover the bottom half of a window but leave the top open for light, or plantation shutters that you can angle. For skylights, consider models that have shades if you ever need to block strong sun or for cleaning. If you’re doing a major remodel and your bathroom is dim, adding a skylight or a solar tube (tubular skylight) can be transformative and often doesn’t require major reframing. It’s an upgrade that particularly pays off in bathrooms that have no exterior window – a solar tube can pipe sunlight from the roof into your windowless hall bath, for example.
Choose the Right Fixtures: The style of your light fixtures will, of course, play a part in the design theme of your bathroom. A row of sleek chrome linear lights will complement a contemporary design, while wall lantern-style sconces in oil-rubbed bronze might suit a more traditional or farmhouse look. Besides style, consider fixtures that seal out moisture (most bathroom lights are designed with enclosed tops or globes to keep water vapor out of the electrical parts). Overhead recessed lights in a shower should have a proper wet-location rating and a trim that won’t rust. And as mentioned, if using any hanging fixture (like a pendant or chandelier), be mindful of code: usually, you must have high ceilings and certain clearances from the tub to allow that, so check with your contractor.
Dimmers, Dimmers, Dimmers: One of the simplest ways to make your bathroom lighting versatile is to put your lights on dimmer switches. Being able to dial down the brightness is a game changer. In the morning, you might want full brightness to wake up and get ready. But at night, or during a relaxing soak, dimmed lights create a calming environment. Also, if someone needs to use the bathroom in the middle of the night, dimming prevents getting blasted by full brightness. (Pro tip: For night use, some people install a very low-level night light or keep a motion-activated LED night light plugged in, so you don’t even have to hit a switch.) Ensure the bulbs you choose are dimmable (most LED bulbs are, but check the packaging, and match them with an LED-compatible dimmer).
Avoid Common Lighting Mistakes: As mentioned, a single ceiling light is not sufficient for a good bathroom experience. Another mistake is placing lights in the wrong position – for example, a recessed light directly over the vanity mirror will cause you to be in your own shadow. Instead, position recessed lights in front of the vanity, not directly overhead where you stand. Also beware of clear glass light fixtures or exposed bulb styles if you’re sensitive to glare; they look stylish, but an exposed Edison bulb can be harsh to look at in a small room. If you love that style, use a very warm, soft bulb or put it on a dimmer for sure.
Lighting and Color Scheme: Remember that the finishes and colors in your bathroom will interact with the lighting. A all-white bathroom will reflect light and generally needs less brightness to illuminate; a bathroom with dark navy or charcoal tiles, or rich wood tones, will absorb more light and might need a bit more lighting oomph. Highly reflective surfaces (glossy tile, mirrors, chrome fixtures) will bounce light around (which can be good, but also can produce glare hotspots if not careful). Matte finishes will diffuse light more gently. This is just something to consider when planning – often, a designer will adjust the lighting plan based on the materials you select. You might not need four recessed lights if your bathroom is small and decked out in light colors; two might suffice along with a good vanity light. Conversely, a larger space with dark stone tile might benefit from an extra lighting source to avoid a cave-like feel.
Bulbs & Tech: For consistency, use the same type of bulbs in all your fixtures where possible (all LEDs, same color temp and brand) so the color of light is uniform. Many people now use smart bulbs or smart switches in bathrooms – this can allow you to adjust color temperature or control lights with voice (“set vanity lights to 50%” while your hands are wet or busy). There are even mirrors with built-in lighting that change color from warm to cool, and even ones with circadian settings to mimic daylight patterns. These are high-tech options if you’re interested in smart home integration (we’ll talk more about smart features in a later section).
Lighting Highlights Recap:
With a well-lit space, you’ll appreciate every other upgrade even more – that tile will sparkle, and you’ll never struggle to see if your tie or makeup is the right color in the morning. Now that we can see clearly, let’s address designing the bathroom for all stages of life and abilities, through smart accessibility features.

A beautifully remodeled bathroom isn’t truly great if it’s not also safe and comfortable for everyone who uses it. Accessible design isn’t just for the elderly or those with disabilities – it’s about good design that makes a bathroom easy to use for all ages and stages of life. By incorporating a few key features now, you can “future-proof” your bathroom so it remains functional as you grow older (or in case your mobility changes temporarily, say, from an injury). And if you have older family members or young children visiting, these features can make their experience safer too. The good news is, modern accessible design can be very stylish – it can blend right in or even enhance the look of your bathroom. Let’s explore some important considerations:
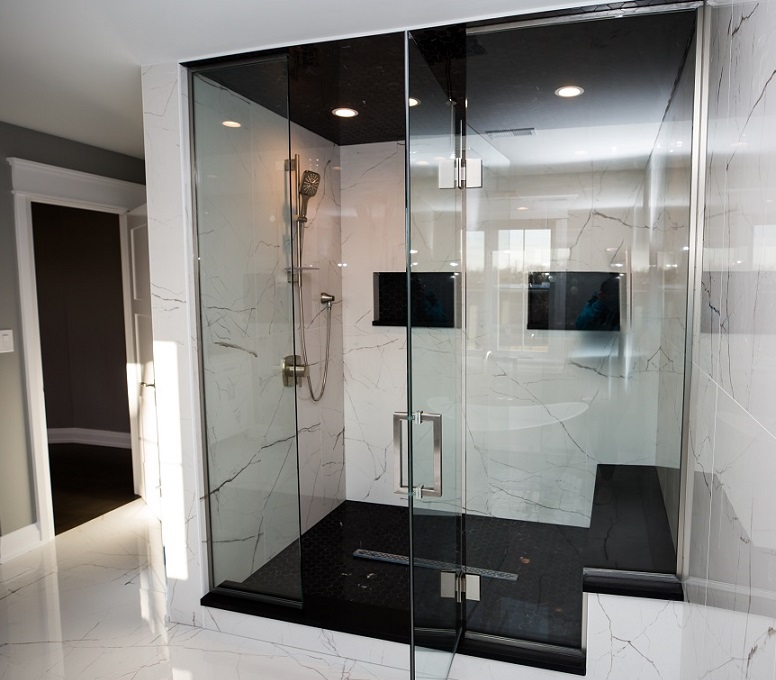
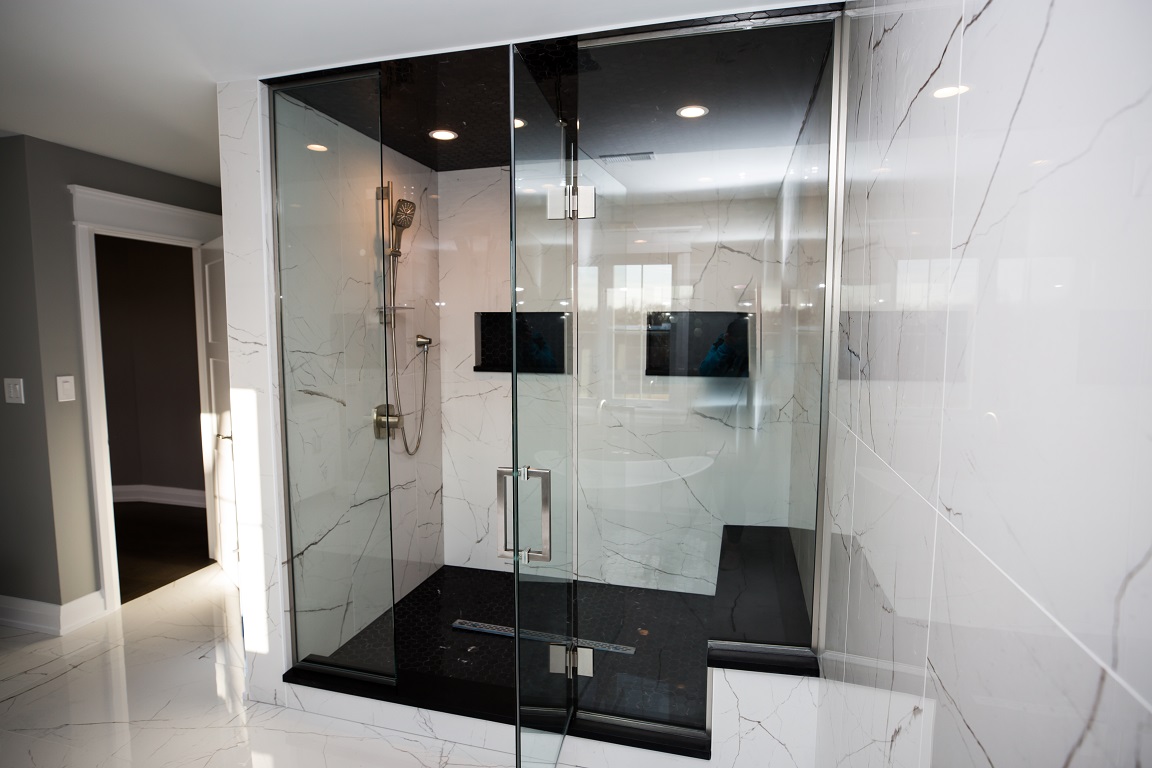
Zero-Threshold (Curbless) Showers: One of the top recommended features for accessibility is a curbless shower. This means the shower floor is level with the bathroom floor (no step up or lip to trip over). Water is contained by a slight slope in the floor towards a drain (often a linear trench drain along one wall). Curbless showers are fantastic not only for people using wheelchairs or walkers (who can roll right in), but also for anyone – it creates a seamless look and no toe-stubbing hazards. It’s also easier to clean (no corners where grime accumulates). If you opt for this, your contractor will need to properly recess the floor or raise the surrounding floor a bit to get the slope for drainage – it’s a bit more involved than a standard pan, but many remodeling pros in Lake Zurich and surrounding areas are well-versed in this now due to its popularity. Even if you don’t specifically need wheelchair access, consider a curbless shower for the sleek look and ease of use (especially if you plan to age in place in your home).
Shower Seating: A built-in shower bench or seat is a wonderful addition. It provides a spot to sit while washing (great for those with limited balance or if you just want to relax in a steam shower). It also comes in handy for propping up legs when shaving, or for placing toiletries. Benches can be a full built-in bench, or a fold-down seat that stays out of the way when not needed. Make sure any folding seat is securely installed into studs or blocking. If you don’t want a permanent bench, even a small portable teak shower stool can do the trick and add a spa vibe.
Grab Bars (But Make Them Stylish): When you hear "grab bars," you might picture something institutional and ugly. But today’s grab bars come in attractive designs and finishes that match the rest of your fixtures, so no one even thinks of them as medical devices. Having grab bars or assist bars in the shower and near the tub/toilet can prevent a slip from becoming a serious injury. Even a healthy adult can appreciate a steadying handle when stepping out of a wet shower. You can install grab bars vertically or at an angle in the shower to help stepping in, and horizontally by the toilet to assist standing up. When remodeling, it’s smart to have your contractor put blocking (reinforcement) between the wall studs in these areas, so even if you don’t mount grab bars now, the walls are ready to support them in the future (this is a cheap “future-proofing” step during construction). However, many people just go ahead and install them now because they can double as towel bars or just blend in. For example, some grab bars are designed to look like a sleek shampoo shelf or a corner soap dish but can hold 300 lbs if grabbed. Pretty neat!
Comfort-Height Fixtures: These are subtle but make a difference. Comfort-height toilets (also called ADA-compliant toilets) are a few inches taller than standard – roughly chair height (~17-19 inches from floor to seat, versus ~15 inches for a standard toilet). This height makes it easier to sit down and stand up, especially for taller people, seniors, or those with knee issues. It’s become a very common choice even for younger homeowners because it’s simply more comfortable (you’ll notice the difference). Similarly, when installing a new vanity, consider making it a bit taller if you’re tall or have back issues. Old vanities were often around 30-32 inches high, but modern comfort-height vanities are more like 34-36 inches high, which saves you from hunching over as much when washing hands or brushing teeth. Little things like this greatly improve daily comfort.
Lever Handles and Easy Controls: Choose lever-style handles for faucets and door hardware instead of round knobs. Levers are much easier to operate for people with arthritis or young kids with small hands – you can even push them with an elbow if your hands are full or soapy. Most modern faucet designs are lever-based anyway, and they add a sleek look. Also consider shower controls that are easy to grasp and have clear markings. Some accessible showers use a thermostatic valve with a large single handle that you can turn easily to adjust temperature and volume. You could even consider digital shower controls (which can be great for accessibility, as they can be operated with the push of a button or remote – more on those in the Smart Features section).
Non-Slip Surfaces: We touched on this in materials, but to re-emphasize: slip-resistant flooring is a must for safety. Use small mosaic tiles or anti-slip porcelain on shower floors, and consider larger floor tiles that are textured or specifically rated for slip resistance in the bathroom. You can also use rubber-backed bath mats outside the shower/tub, but those are secondary measures; the flooring itself should be as safe as possible. If you love the look of a smooth tile, maybe use it on the wall and opt for a safer tile on the floor.
Wider Doorways: If possible, enlarge the bathroom door to 34-36 inches wide (standard doors are often 28-30 inches). A wider door not only allows wheelchair access if ever needed, but also just makes it easier to carry laundry baskets, maneuver with a child in arms, etc. This might not always be feasible (depending on adjacent walls/rooms), but if you’re reframing anyway, consider it. Also, having a low threshold or no threshold at the door (no big transition strip) helps prevent tripping.
Good Lighting and Contrasts: As part of accessibility, ensure the lighting we discussed is ample – older eyes need more light. Also having color contrast in certain areas can help visually impaired users (for instance, a floor that contrasts slightly with the wall, or towels that stand out from their background). This doesn’t mean you need a wildly different color scheme, just small thoughtful touches like an accent stripe of tile that delineates edges or choosing hardware that contrasts with the vanity color.
Accessible Storage: Think about storage placement: are the shelves or medicine cabinet easy to reach? Maybe include some storage at a lower height if a family member uses a wheelchair or if kids need access to certain items. Large pull-out drawers in vanities are generally easier to use than deep cabinets where you have to bend and search for items in the back.
Walk-in Tubs vs. Showers: If you or a family member really enjoys baths but can’t step over a high tub wall, there are walk-in bathtubs with doors that allow easier entry. These are specialty fixtures – they can be a great solution for those with limited mobility who still want to soak. They do have some drawbacks (you have to sit in them while they fill and drain, for instance), so many people opt for a large shower with a bench instead. But it’s worth knowing about if soaking therapy is important to you. There are also tub transfer benches and other equipment that can be used with a standard tub if needed, but since we’re designing a remodel from scratch, it’s better to integrate accessibility into the build.
Planning for the Future: Even if you are completely mobile and agile today, time will march on. Incorporating these elements doesn’t necessarily mean your bathroom will look like a hospital – quite the opposite. The idea is to design subtly for the future while achieving a gorgeous result now. If you live in your “forever home,” you’ll thank yourself later for including, say, that curbless shower and wider door if you ever do have a sprained ankle or simply less agility in older age. And in the interim, features like a bench, handheld shower, and higher vanity just make life more convenient anyway.
Accessibility Highlights:
By embracing universal design principles, your new bathroom will be welcoming to everyone and adapt to your needs over time. It’s a smart investment in both functionality and peace of mind. Now, let’s tackle another crucial aspect that can often be an afterthought: storage. A gorgeous bathroom isn’t so gorgeous if it’s cluttered with bottles and towels everywhere, so we’ll fix that next.

One of the biggest complaints homeowners have about their bathrooms (especially older designs) is lack of storage. Where do you put all the towels, toiletries, toilet paper, cleaning supplies, hair dryers, makeup, and so on? A bathroom remodel is the perfect time to incorporate smart storage solutions so that everything has a place. The goal is to create a space that is easy to keep organized, which in turn makes your daily routine smoother and keeps your beautiful new bathroom looking tidy and tranquil. Here’s how to maximize storage in style:
Vanity Storage – Drawers are Your Friend: If you’re installing a new vanity, pay attention to the configuration. Drawers in the vanity (versus just one big open cabinet with doors) make storage much more user-friendly. Drawers allow you to organize items by category and easily see and reach the back. No more getting on hands and knees to rummage under the sink! Many vanities now come with “U-shaped” drawers or clever cutouts to fit around plumbing while still giving you drawer space. You can use top drawers for small items (toothpaste, cosmetics, etc.) and deeper bottom drawers for larger items (extra shampoo bottles, hair dryers, etc.). Consider adding organizers or dividers inside drawers to keep everything in place. If you prefer a clean minimalist look, a floating vanity might have less cabinetry, but you can still find floating vanities with drawers. Just ensure the wall mounting is solid given the weight of stored items.
Medicine Cabinets Reimagined: The old-school medicine cabinet (a mirrored cabinet above the sink) fell out of favor for a while, but it’s making a comeback in remodeled bathrooms – and the modern versions are fabulous. Instead of a flimsy tin box, today’s recessed medicine cabinets can be sizable, with mirrors on the inside, built-in lighting, outlets, and even refrigeration (for beauty products or medicines that need cooling). Recessing a cabinet into the wall between studs gives you a few inches of deep storage that basically takes up no space in the room. This is prime storage for daily use items like skincare products, medications, or an electric toothbrush. If the vanity is a double-sink, you could do two separate medicine cabinets (one over each sink or one large one that spans both). If you don’t like the look of a visible cabinet, another idea is a medicine cabinet hidden behind a full-size mirror or art piece – talk to your contractor about creative options. But frankly, most modern mirrored cabinets look sleek, especially the frameless or thin-framed ones.
In-Shower Storage: If you’re retiling your shower, plan for at least one shower niche (a built-in shelf recessed into the wall). Niches are a lifesaver for storing shampoo bottles, soap, and razors neatly. No more flimsy hanging caddies or balancing bottles on the tub edge. Niches can be made a feature with decorative accent tile or kept subtle to blend with the wall. Pro tip: If you have a large shower, consider a vertical niche (like a tiled channel) or multiple niches – maybe a lower one to reach from the tub and a higher one for stand-up shower use. Ensure the niche is placed out of direct shower spray if possible (so water doesn’t collect in it) and that it’s properly sloped to drain. If a niche isn’t possible (e.g., an exterior wall might not have enough depth), corner glass shelves or teak shelves can be installed, but built-in niches are by far the most popular and aesthetically pleasing solution.
Linen Closet or Cabinet: If you’re lucky enough to have a linen closet in or near your bathroom, definitely optimize it (add shelving, organizers, etc.). But many bathrooms, especially older ones, don’t have a built-in closet. In a remodel, see if you can carve out a linen niche or cabinet. This could be a tall cabinet built into a corner or even a shallow cabinet recessed into the wall. Even a 12-inch deep cabinet on a wall can store a stack of towels and supplies. Some homeowners repurpose space: for example, stealing a bit of space from an adjacent hallway or bedroom closet to create a small linen closet accessible from the bathroom. If that’s not an option, a freestanding tall cabinet or étagère could work – there are slim cabinets that can fit in small spaces (like between the toilet and wall) for added storage. Just measure carefully to ensure any added furniture doesn’t crowd the room or impede movement.
Over-the-Toilet Solutions: The wall above the toilet is often underutilized real estate. You can install a cabinet or set of shelves above the toilet to store toiletries or decor. One option is a shallow depth cabinet high enough so you’re not hitting your head, but low enough to reach easily – typically the bottom of such a cabinet would be a foot or two above the top of the toilet tank. Alternatively, floating shelves with some nice baskets can hold extra toilet paper, tissues, etc., and also display a plant or decorative items to make the space feel cozy. Just be sure whatever is above the toilet is very secure on the wall (we don’t want anything falling down into the toilet!) and not too deep (4-6 inches deep for shelves is plenty, 8 inches for a cabinet is usually max) so it doesn’t feel intrusive when you’re using the toilet.
Hooks, Rods, and Holders: Don’t forget the simple stuff. Towel bars (or towel hooks if you prefer) provide designated spots for wet towels to hang dry. Plan for at least one 24-inch towel bar per person who uses the bathroom regularly, so everyone’s towel has a home (in a pinch, two hooks can fit in the space of one bar and hold two towels). Install a robe hook or two near the shower or tub to hang a robe or change of clothes. A toilet paper holder that’s within easy reach of the toilet (and not installed at an awkward angle or too far behind) is key – nowadays you can get single-post TP holders that make roll changing super easy, or even recessed TP holders if you need to save space. Also consider where a trash can will go and if you need a holder for the toilet brush – these are small things, but it’s nice to have a spot for them (some vanities have a tilt-out hamper or a compartment for a wastebasket).
Think Vertical and Think Hidden: Use vertical wall space for storage whenever possible – besides over the toilet, think about corners (corner shelving can be cute and space-efficient). If you have high ceilings, you might add a high shelf above the door or along a wall for storing infrequently used items or display (just ensure heavy items are not stored way up high where reaching them is dangerous). “Hidden” storage can include things like built-in niches with cabinet doors that blend into the wall, a mirrored panel that slides to reveal shelving, or using the space between studs to recess a narrow cabinet. For example, there are towel niche cabinets that fit between studs and have a door, so you could stack towels in the wall – it only projects maybe 4 inches into the room.
Consider a Shower Ledge or Bench Storage: Another clever idea: if doing a custom shower, you can build a full-length ledge along one wall (about 6-8 inches deep and maybe 12-18 inches high) – it acts like a long niche that you can also sit on briefly or prop a foot on. It’s easier to construct than a fully recessed niche and can store lots of products. Likewise, a built-in bench can sometimes have a flip-up lid for storage (though if it’s often getting wet, that might not be practical for things that can’t get damp – better for, say, storing shower cleaning tools).
Open vs Closed Storage: Decide what you want visible. Open shelves are great for items that look nice (fluffy towels, a plant, decorative bottles) and for everyday grab-and-go things. Closed cabinets hide clutter and things you may not want on display (cleaning supplies, personal products). A mix is ideal: perhaps open shelving for display and easy access, combined with closed drawers/cabinets to tuck away the less sightly necessities. If you do open shelves, keeping the number of items on them minimal or organized in baskets will maintain that spa-like look. Too many random items can quickly look messy.
Laundry Consideration: If your bathroom often generates laundry (towels, clothes), consider where a hamper will go. Maybe a pull-out hamper in the vanity, or a nice lidded basket in a corner. Having it planned means your new bathroom won’t end up with clothes on the floor.
Electrical Outlets in Storage: Here’s a high-end tip that’s actually super practical: Ask your electrician to put an outlet inside a vanity cabinet or drawer. This way, you can keep a hair dryer or electric toothbrush plugged in inside the drawer, and just open it to use, then stow away. No more cords cluttering the counter! There are special kits for in-drawer outlets that have a cut-off switch when the drawer closes (for safety). Even a charging outlet inside a medicine cabinet for razors or rechargeable face brushes is great. This kind of detail really takes your bathroom to the next level of convenience.
Storage Planning Checklist:
With ample and well-designed storage in place, your bathroom will be easier to keep neat, making the overall experience more luxurious. No one relaxes well in a cluttered environment. Now that we’ve organized the physical space, let’s look at integrating some of the latest technology and smart features that can add convenience and a bit of “wow” factor to your bathroom remodel.

Welcome to the future! Bathrooms have joined the smart home revolution, and there are now a variety of smart features and gadgets that can be incorporated into your remodel. These upgrades can improve comfort, convenience, and even efficiency. Since our target homeowners are tech-savvy enough (and often have the budget for some extras), it’s worth considering which smart bathroom innovations might make sense for you. Here’s an overview of popular smart bathroom features and how they can enhance your space:
Smart Showers: Imagine stepping into your shower and the water is already at your perfect temperature – no fiddling with knobs, no cold shocks. Digital shower systems make this possible. These systems replace traditional faucets with a digital control panel or even an app. You can pre-set profiles for each user (so, for instance, you press “Morning Shower” and it delivers 102°F water at a steady medium flow, or “Relax Mode” for a steamy lower-flow shower with the rain showerhead and perhaps colored mood lighting if you have it). Brands like Moen, Kohler, and others offer smart shower controllers that can connect to voice assistants. Picture saying, “Alexa, start my shower” and having it warm up while you finish your coffee! Some systems allow remote activation, which is convenient – you don’t have to get wet reaching in to turn it on. Smart showers can also include features like built-in Bluetooth speakers or integration with smart home routines (so music or news plays when you start the shower, for example). If that’s too high-tech, you can still improve your shower with simpler tech like a thermostatic valve (which isn’t digital, but it precisely regulates temperature to keep it consistent if water pressure fluctuates, preventing the hot/cold spikes when someone else uses water in the house).
Intelligent Toilets and Bidets: The toilet is not left behind in the tech wave. Smart toilets or advanced bidet seats have become very popular in upscale bathrooms. These can include features such as: heated seats (no more cold shock on winter mornings!), an integrated bidet function (spray of water for cleansing, which is more hygienic and eco-friendly than just toilet paper), air drying, auto flushing, auto open/close lids, night lights, and even deodorizing fans. Some high-end models like Toto’s Neorest are all-in-one smart toilets that look ultra-modern (tankless design) and do everything automatically. But you don’t need to replace your whole toilet; you can also add a smart bidet seat onto a standard toilet. Brands like Toto, BioBidet, Brondell, and Kohler have models with various combos of the above features. Many homeowners say once they’ve experienced a bidet seat, they never want to go back – it can seriously elevate your comfort and personal hygiene. Plus, for older individuals or those with mobility issues, a bidet can make independent bathroom use easier. When considering these, ensure you have an electrical outlet near the toilet (your remodel electrician can add one, as these seats need power).
Voice-Activated or Sensor Faucets: While more common in kitchens or public restrooms, some people do opt for touchless faucets in their home bathrooms as well. A motion-sensor bathroom faucet allows you to wash hands without touching the handle – great for reducing spread of germs (and convenient if your hands are messy). They also automatically turn off, which can save water if you have kids who forget to shut the tap. Voice-activated faucets are newer – imagine saying “turn on faucet to warm” – though those are still a novelty and less common in residential use. Simpler but useful are touch faucets (where a tap anywhere on the spout turns it on/off). Whether these are necessary in a bathroom is debatable, but they’re an option. At the very least, as mentioned earlier, choose lever handles which are practically “elbow activated” if needed.
Smart Lighting & Mirrors: Integrating your bathroom lighting with smart home systems can be as easy as using smart bulbs in your fixtures or installing smart switches. This allows you to set up routines or control lights via voice/phone. For instance, a “Good Morning” routine could gradually brighten the lights and turn on a preset radio station via a smart speaker. Or “Nighttime” could dim everything to 10% for a late-night bathroom trip. Also consider smart mirrors: these are mirrors with tech features like built-in LED lighting (often touch-dimmable or color changing), anti-fog demisters (no more wiping the mirror after a hot shower), and some even have displays for weather, time, or news. There are mirrors that pair with your phone to show notifications or play music through built-in speakers. While not everyone needs a news-ticker in their mirror, a mirror with excellent lighting and defogger is quite practical. They even make mirrors with Alexa built-in (essentially a mirror that’s also a smart speaker).
Heated Floors (Radiant Heat): Stepping onto a warm floor on a cold morning is pure bliss. Electric radiant floor heating is a popular upgrade in bathroom remodels, especially in cold climates like Illinois can have. Thin heating mats or wires are installed under the tile floor, and they are controlled by a thermostat – which can be a smart thermostat that you program or even control via app. For example, you can set the floor heat to come on automatically at 6 AM so by 6:30 when you step in, it’s toasty, and then off again after you leave for work. Some systems have remote control so you could turn it on spontaneously from your phone while still in bed. Radiant heat not only warms your feet but it gently warms the whole room from the floor up, which can take the chill out of the bathroom better than a noisy fan heater. It’s also energy-efficient for the comfort it provides (you don’t run it constantly, mostly just around your usage times). If your remodel is replacing flooring anyway, it’s the perfect time to add this.
Smart Ventilation Fans: We’ve talked about how crucial ventilation is – you can make your fan “smart” by choosing one with features like a humidity sensor (it will auto-turn on when humidity spikes, e.g., during a shower, and turn off after the air is cleared). This is great because you don’t have to remember to flip the switch every time. Some fans also have motion sensors (turn on when someone enters – useful for powder rooms to clear odors, etc.). Others integrate with smart home systems or have multi-function: for instance, a bath fan with built-in Bluetooth speakers so you can play music while showering, or with color-changing LED lights to add ambiance. There are even models with a built-in Alexa voice assistant. Whether you need that is up to you, but it exists! At minimum, a quiet fan with a humidity sensor is a smart choice to preserve your new bathroom.
Water Monitoring and Leak Protection: Another smart feature, less glamorous but very practical, is smart water monitors or leak detectors. These can be installed on your main water line or individual fixtures to detect leaks or unusual water usage. For instance, a sensor behind the toilet or under the sink can send an alert to your phone if it detects water pooling – potentially saving you from expensive damage if a leak springs. A whole-house system might automatically shut off water if a major leak is detected (some people do this when they travel, for peace of mind). Additionally, some smart showers or faucets can track water usage and report back, which helps if you’re monitoring your environmental footprint or trying to reduce utility costs.
Chromotherapy and Aroma in the Bath: For the ultimate spa-like experience, consider features that engage senses beyond just touch. Chromotherapy is the use of colored light in the tub or shower to influence mood (soft blue light for calm, energizing purple, etc.). Some high-end tubs come with built-in chromotherapy LED lights that glow through the water. Aromatherapy features might include diffusers or showerheads that have an infusion system for essential oils (imagine a eucalyptus steam shower—many steam shower units allow you to add aromatherapy oils). These might not be “smart” in the tech sense, but they are modern wellness features that can elevate your bathroom to a personal spa.
Smart Assistant Integration: Think about how you use your bathroom and if hands-free control would benefit you. Many people enjoy having a smart speaker (like an Amazon Echo or Google Nest) in the bathroom. It’s useful for listening to music, news, or podcasts while getting ready or showering, and you can voice-control other smart devices (“lower the lights,” “how’s the traffic,” “add shampoo to my shopping list” – whatever). If you have privacy concerns, you can opt for just a Bluetooth speaker without a microphone, but a voice assistant can be surprisingly handy in a bathroom setting.
It’s important to note: you don’t have to incorporate all of these! Smart features should align with your lifestyle. If you’re not into tech, focus on the ones that offer clear practical benefits (heated floors, maybe a bidet seat and a good fan). If you love the latest gadgets, you might go further with digital controls and app-connected systems. Also, make sure any tech you install has a manual override or manual way to use it too. For example, a digital shower should have a fail-safe way to turn water off if the controller fails, etc. Good products will account for that. Likewise, have a standard light switch in addition to app control for lights – you don’t want to pull out your phone every time you need to turn on a light.
Smart Feature Highlights:
As always, weigh the cost of these upgrades against the value they bring to you. Some smart features are relatively low-cost (smart switches, bidet seats) while others are high-end investments (smart toilets, whole digital shower systems). The nice part is many of these can be added on later if you decide not to do all at once – for instance, you can wire for a future digital controller but install a regular one now, or add smart bulbs after the remodel. Talk with your contractor about including necessary outlets or wiring during the remodel so you have the flexibility.
Now that we’ve covered the core design elements and the bells & whistles, it’s crucial to make sure we avoid some common pitfalls that can trip up bathroom remodelers. In the next section, we’ll discuss common mistakes and misconceptions to be aware of before you start swinging the hammer (or more likely, before you direct your contractor to!).

Even with the best of intentions, a bathroom remodel can go awry if you fall victim to certain common mistakes. Homeowners 35+ (and really, any age) often learn some of these lessons the hard way on a first project – but you don’t have to. Here, we’ll highlight major pitfalls to avoid and clarify a few misconceptions, so you can go into your remodel with eyes wide open and come out with a result you love (rather than a list of “I wish I had known…” regrets).
1. Don’t Buy Fixtures or Materials Too Early (Consult First!): It’s exciting to pick out a stunning freestanding tub or a luxury rain showerhead on sale online – but hold off on major purchases until you have a finalized design and have consulted your contractor. One of the biggest mistakes is buying items that either don’t fit, aren’t compatible with your plumbing/HVAC, or end up not working with the design. For example, you might fall in love with a vanity only to find it’s 4 inches too wide for the space, or order tiles that turn out to be too thick for the transition by the door. Or purchasing a toilet that requires a different rough-in size than your drain (toilets come in 10”, 12” rough-in etc.). Always coordinate with your contractor or designer – they might suggest waiting to order until certain measurements are confirmed, or they might have access to better pricing through suppliers. Additionally, some materials are best seen in person (color variations in tile batches, comfort of a tub, brightness of a light fixture). So while it’s great to research and have favorites, don’t click “buy” on everything the moment you decide to remodel. Make a list and review it with your contractor during planning.
2. Not Setting (and Sticking to) a Budget and Scope: Remodeling costs can creep up quickly if you don’t establish a clear budget. It’s a mistake to start demo and “see where things go” – always plan your budget in detail. However, also be realistic and flexible: unexpected issues might arise (like finding rot or outdated wiring that must be addressed for safety). That’s why we emphasize having a contingency fund. Another mistake is continually adding “just one more upgrade” during the project. Upgrading to a slightly more expensive tile, then a nicer faucet, then a better light – each seems small, but they add up. Try to finalize your choices in advance and stick to them as much as possible. If you absolutely must have that fancier vanity that costs $1,000 more, be prepared to cut $1,000 somewhere else or accept extending the budget. A good contractor will communicate costs and get approvals for changes, but it’s on you to not get carried away. Prioritize your must-haves vs. nice-to-haves early on. If you hit a budget limit, you’ll know what items you’re willing to compromise on or defer.
3. Failing to Plan the Little Details (Layout and Function): We covered layout planning a lot, but a common regret is not considering the small functional details until it’s too late. This can include: forgetting an outlet where you need one, not planning a place for the shampoo bottles (no niche – and later realizing you should have added one), door swings that block something, not accounting for how a vanity drawer might hit the shower trim if placed too close, etc. It’s a mistake to assume “the contractor will figure it all out.” Yes, they know how to build it, but they need your input on how you will use the space. So walk through the usage of your new bathroom in your mind (or even tape out the space in an empty room or use a 3D design tool) to catch these things. For instance: “Where will my electric toothbrush sit? Is there an outlet near that? Will the mirror medicine cabinet be able to open without hitting the light fixture? Did I remember to plan a towel bar within reach of the shower?” Asking these questions beforehand can save you from an “oops” later. Also, consider sightlines: when the bathroom door is open, what do you see? Ideally not the toilet (especially for a powder room that guests use). A small shift in layout could hide the toilet behind a half-wall or vanity. These thoughtful touches elevate the design.
4. Overlooking Ventilation and Waterproofing: We’ve mentioned ventilation but it bears repeating as a common oversight. A fancy bathroom will not stay nice if it’s a mildew factory. Never skip on a quality exhaust fan and make sure it’s sized right for the room (bath fan power is measured in CFM – cubic feet per minute; larger bathrooms or ones with jetted tubs need higher CFM). Vent it to the outside properly (not just into an attic). If you can wire it to a timer or humidistat, even better to ensure it runs long enough after a shower. Waterproofing: similarly, using the right substrate and sealants in wet areas is critical. Perhaps you’re not DIYing this, but if a contractor ever suggests a shortcut like “we can tile right over this drywall” in a shower – red flag! Use cement board and waterproof membranes. Yes, these materials have a cost, but mold remediation or repairs later cost far more. So, the mistake here would be hiring someone who cuts corners or not being aware of the importance of these behind-the-scenes steps. Avoid it by choosing a reputable contractor and discussing these points.
5. Choosing Trends Over Timelessness (to an Extreme): Everyone loves a good trend (those gold fixtures and geometric tiles are hot right now!). And it’s great to incorporate modern style – after all, you’re remodeling to get rid of the 1990s brass and floral wallpaper, right? However, be cautious about going too trendy on permanent elements unless you are prepared to possibly update them in 5-10 years. A common regret is choosing something super trendy that ages quickly. For example, if you tile your entire shower in a very bold pattern that you may tire of, that’s expensive to change later. Instead, one strategy is to keep the big-ticket, hard-to-change items (tile, tub, vanity) in a classic or neutral style you love, and play with trendy colors or finishes in things that are easier to swap (paint, cabinet hardware, light fixtures, even the vanity faucet to some extent). That being said, it’s your bathroom – you should express your style! Just try to envision living with choices long-term. The mistake is not thinking of the future you who might not be as in love with the “color of the year” as current you is. Strike a balance: maybe that trendy item can be an accent that can be redone without redoing the whole room.
6. Going Cheap on Important Things: Budgeting smartly doesn’t mean choosing the absolute cheapest everything. There’s the old saying, “you get what you pay for.” In a bathroom, some things are worth investing in quality – particularly anything that involves water or daily use. Don’t skimp on the waterproofing, plumbing fixtures, or labor quality. Using a cheap faucet might mean leaks or finish peeling in a couple of years. Inexpensive vanities might have poor construction that warps. Bargain-basement tile might crack or be irregular making installation difficult (hence labor costs rise or it looks shoddy). That’s not to say you must buy luxury brands – there are many mid-range products that perform excellently – just avoid things that seem too-good-to-be-true in price, as they might compromise longevity. Another common mistake is hiring the cheapest contractor without thoroughly checking their work or references. An amazing design can be ruined by poor installation (lippage in tiles, bad grout lines, misaligned fixtures, etc.). It’s better to spend a bit more on a qualified installer than to pay twice because you had to redo something.
7. Assuming “High-End Home = Overcharged by Contractor”: Let’s tackle the misconception mentioned: “contractors overcharge for high-end homes.” Some homeowners worry that because they live in an upscale area or have a nice house, a contractor will pad the quote thinking they can pay more. In reality, reputable contractors base their pricing on the scope of work, materials, and labor – not your zip code or home value. The reason a remodel in a high-end home might cost more isn’t a “rich tax,” but because often homeowners in higher-end homes choose upscale finishes, custom work, or complex features which naturally cost more in materials and the detailed labor to install them. For example, a custom curbless shower with imported tile and a heated floor costs more than a basic tub insert – but that’s due to the product and work, not the home’s value per se. A trustworthy contractor will provide an itemized estimate showing where the costs are (demolition, plumbing, tile install, fixtures, etc.). If something seems off, ask questions. Good pros welcome transparency. Of course, do your due diligence: get multiple quotes, check reviews, and ensure whoever you hire is licensed and insured. But don’t short-change yourself by picking someone cheap who cuts corners, out of fear that everyone is out to overcharge you. The best approach is to find a contractor you trust (maybe via referrals from neighbors or local reviews) and work with them on value-engineering the project to fit your budget if needed (like suggesting cost-effective alternatives where appropriate). Ultimately, quality workmanship is worth the price, and most contractors truly want to deliver a result that matches the price tag.
8. Trying to DIY Beyond Your Skill: Many homeowners are handy and can tackle parts of a bathroom project – painting walls, maybe replacing a faucet or installing accessories. But a full bathroom remodel is a complex job with many trades involved (plumbing, electrical, tiling, waterproofing, cabinetry, etc.). A classic mistake is a DIYer getting in over their head – leading to either an unfinished project that drags on or, worse, hidden mistakes (like a slight shower pan leak or improper slope) that cause big trouble later. If you’re not very experienced with bathrooms, consider leaving the critical work to professionals. Perhaps you do the demo and painting to save some labor cost, but let licensed folks handle the plumbing, electrical, and tiling. There’s no shame in hiring experts; that’s what ensures the outcome looks and functions like a pro-level remodel. Plus, a contractor often has a warranty on their work, so if something isn’t right, they fix it. If you DIY and something fails, it’s all on you (and potentially more expensive to fix later). So weigh the cost vs. benefit carefully. Many a weekend warrior has found themselves without a functioning bathroom for months because life gets busy or a step was harder than anticipated.
9. Rushing the Timeline: Patience is key in a remodel. A mistake is setting an overly optimistic timeline or pushing the crew to finish by an unrealistic date. Good work takes time – tiles need days for proper setting and drying, custom glass may only be measured after surfaces are done (then takes weeks to fabricate), materials could be on backorder. Build in buffer time in your expectations. It’s understandable to want it done ASAP (living through construction is not fun), but rushing can lead to sloppy work or missed steps. Trust the timeline your contractor gives, and pad it a little in your mind. If you absolutely need it by a certain date (say before a big event at your home), start well in advance of that and communicate clearly, but still be prepared with a backup plan if slight delays occur. A common frustration is “why aren’t they working today? nothing’s happening!” Sometimes there’s unavoidable downtime (waiting on inspections or material curing). If you feel communication is lacking, talk to your contractor rather than silently stewing. Most will explain the process. It’s better to finish a week later with everything done right than to finish on time with errors.
10. Neglecting Future Maintenance: In the excitement of new everything, people might forget that all bathrooms need upkeep. Plan for maintenance needs: e.g., if you choose glass shower doors, will you squeegee them regularly to avoid water spots? If not, maybe get protective coating or consider textured glass. If you get natural stone, are you okay sealing it annually? (Or choose porcelain lookalikes if not.) Install caulk and grout that are mold-resistant to reduce issues, but know that down the road, caulk might need replacing (it’s normal). Keep some extra tiles and paint for future repairs. A mistake is tossing all leftovers – keep a box of spare tiles and a bit of matching grout in case you need to patch something later. Also, ask your contractor to walk you through shut-off valves, etc. at the end of the job, so you know how to quickly stop water in an emergency. Being prepared and informed helps your beautiful bathroom stay that way.
Let’s boil these down into a quick “Remodel Don’ts” checklist to keep in mind:
By avoiding these mistakes, you set yourself up for a successful, headache-minimized project. Knowledge truly is power here – knowing what not to do is as important as knowing what to do.

Embarking on a bathroom remodel can feel daunting, but with the right planning, team, and mindset, it’s absolutely achievable — and even enjoyable. You’re not just upgrading a room; you’re investing in your home’s value, your daily comfort, and even your health and well-being (who doesn’t feel better after a relaxing shower in a beautiful space?). Let’s recap the journey to your dream bathroom and how to make it a success:
From Vision to Reality: Start by envisioning how you want your new bathroom to look and function. Use this guide to inform your vision: you’ve considered layout improvements, chosen durable and stylish materials, planned out layered lighting, included touches for safety and accessibility, maximized your storage, and perhaps sprinkled in some smart tech for luxury and convenience. That initial vision, combined with solid research (which you’ve done by reading this far!), is the foundation. The homeowners who get the best results are the ones who plan thoroughly and communicate clearly with everyone involved.
Team Up with a Trustworthy Contractor: A skilled, reputable contractor is like a partner in your remodel. They bring expert knowledge of construction, local codes (in Lake Zurich, Barrington, Crystal Lake, etc.), and practical experience about what works best. Share your goals and concerns with them. If you’re worried about budget, a good contractor might suggest alternative materials or phased approaches. If you’re skeptical about a high quote, they can break down the costs and explain — remember, transparency builds trust. It’s also wise to get a few quotes to compare (and check references!). Once you’ve chosen your contractor, treat them with respect and expect the same in return. Regular check-ins and walk-throughs during the project can keep everyone on the same page. Don’t hesitate to ask questions or express concerns. It’s far easier to tweak things mid-project than to live with something you’re not happy with.
Local Insight: Since you may be specifically looking for “bathroom remodeling Lake Zurich” or nearby areas, keep in mind any local factors: Our Illinois climate means big temperature swings and humidity in summer — proper ventilation and maybe heated floors make a difference. Homes in these communities might have particular styles or age-related quirks (some Lake Zurich homes might have been built in the 1980s with specific plumbing setups, for example). A local contractor will understand these context clues. Also, if aiming for resale value in a higher-end market like Barrington, it might influence your choices (maybe leaning more classic upscale than extreme quirky personal style, for instance). But if this is your forever home, personalization is key.
Utilize Checklists and Tools: Use the checklists we’ve provided as you plan and even during the final punch list stage to ensure nothing is missed. It might help to maintain a project binder or digital folder with all your selections, receipts, and notes. That way if you need to find the paint color or warranty info later, it’s handy. Little organizational steps like this can reduce stress.
Expect the Unexpected (Just a Little Bit): Even with meticulous planning, renovations can throw a curveball. Maybe the floor joists need reinforcing for that new tile, or the special-order faucet is delayed. Keep calm and work with your contractor to solve the issue. There is almost always a solution or plan B. Having that contingency budget and a flexible attitude keeps those surprises from derailing the project. And when something does go perfectly smoothly or an element turns out even better than expected, celebrate that win!
Enjoy the Process: It might sound odd, but try to find enjoyment in the remodeling process itself. It’s rewarding to see your old space transform step by step. Take progress photos — it’s fun to look back on the “bathroom guts” and appreciate the craftsmanship behind the walls. And if you have kids, it can be an educational experience for them to see how rooms are built and to know that good things take time and work.
The Big Payoff: Finally, when all the dust has settled (literally, after that final cleanup) and you’re standing in your newly remodeled bathroom, take a moment to appreciate what you’ve accomplished. You now have a bathroom that is tailored to your needs and tastes. Everything is shiny and new, but also thoughtfully designed to be safer, more efficient, and easier to maintain than what you had before. Whether it’s the indulgence of a rain-head shower on a groggy morning or the convenience of having all your toiletries neatly organized at your fingertips, you’ll feel the improvement daily.
Remember that a well-done bathroom remodel isn’t just an expense, it’s an investment. It will add to your home’s resale value (bathrooms and kitchens sell houses, as the saying goes), and if you’re staying put, it adds to your quality of life. Many homeowners say a bathroom remodel made them feel like they were in a new house without having to move.
If you ever feel uncertain at any step, don’t hesitate to seek professional advice. Sometimes an hour or two of a designer’s time for a consultation, or a quick chat with a plumber about options, can save you from costly mistakes. And certainly, when it comes time to do the work, lean on the pros for their expertise.
Encouragement to Connect: If you’re a homeowner in Lake Zurich, Barrington, Crystal Lake or the surrounding area and you’re considering a bathroom remodel, we hope this guide has answered many of your questions and sparked some ideas. Every bathroom and every homeowner’s needs are unique – that’s what makes remodeling both challenging and exciting. Don’t be afraid to reach out to local remodeling professionals to discuss your project. Most are happy to provide initial consultations or estimates, and you can get a feel for who might be the right fit to bring your vision to life. When you find a contractor who listens, communicates well, and has a solid plan to achieve what you want within your budget, you’ve struck gold. Trust and communication with your contractor are the cornerstone of a successful remodel.
At the end of the day, your new bathroom should make you smile every time you walk in – knowing you have a beautiful, functional space that was designed just for you. From the layout that flows just right, to the materials that give you joy (that perfect tile pattern or the feel of those heated floors), to the soft glow of your carefully placed lights during a late-night soak – it all comes together to create your personal haven.
Congratulations on taking the steps toward your bathroom transformation! With careful planning, a bit of patience, and the tips from this guide, you’re well on your way to enjoying the bathroom of your dreams. Here’s to many years of comfort, style, and satisfaction in your new space. Happy remodeling!